The Short Version
- Professional mold remediation follows eight steps: inspection, testing, containment, air filtration, removal, cleaning, restoration, and clearance testing.
- Most residential jobs take 3 to 7 days start to finish. A straightforward single-room project can wrap in 1 to 2 days.
- Legitimate companies hold IICRC and/or ACAC certifications, carry pollution liability insurance, and always run a clearance test when the work is done.
- Average costs range from $1,500 to $5,000 for typical residential projects. Complex jobs with structural work can run $10,000 or more.
Calling a mold remediation company for the first time can feel like handing the keys to your house to a stranger. You do not know what they are going to find, how long they will be there, or what the final bill will look like. That uncertainty makes it easy to keep putting the call off.
This guide breaks down every step of the professional remediation process in plain language so you know what to expect. The goal is simple: by the time you finish reading, the process should feel manageable, not mysterious.
What's In This Guide
- Step 1: Initial Inspection and Assessment
- Step 2: Mold Testing and Lab Analysis
- Step 3: Containment
- Step 4: Air Filtration
- Step 5: Mold Removal
- Step 6: Cleaning and Sanitizing
- Step 7: Restoration
- Step 8: Clearance Testing
- Certifications to Look For
- Red Flags in Remediation Companies
- Typical Project Timeline
- How to Prepare Your Home
- After Remediation: Preventing Recurrence
Initial Inspection and Assessment
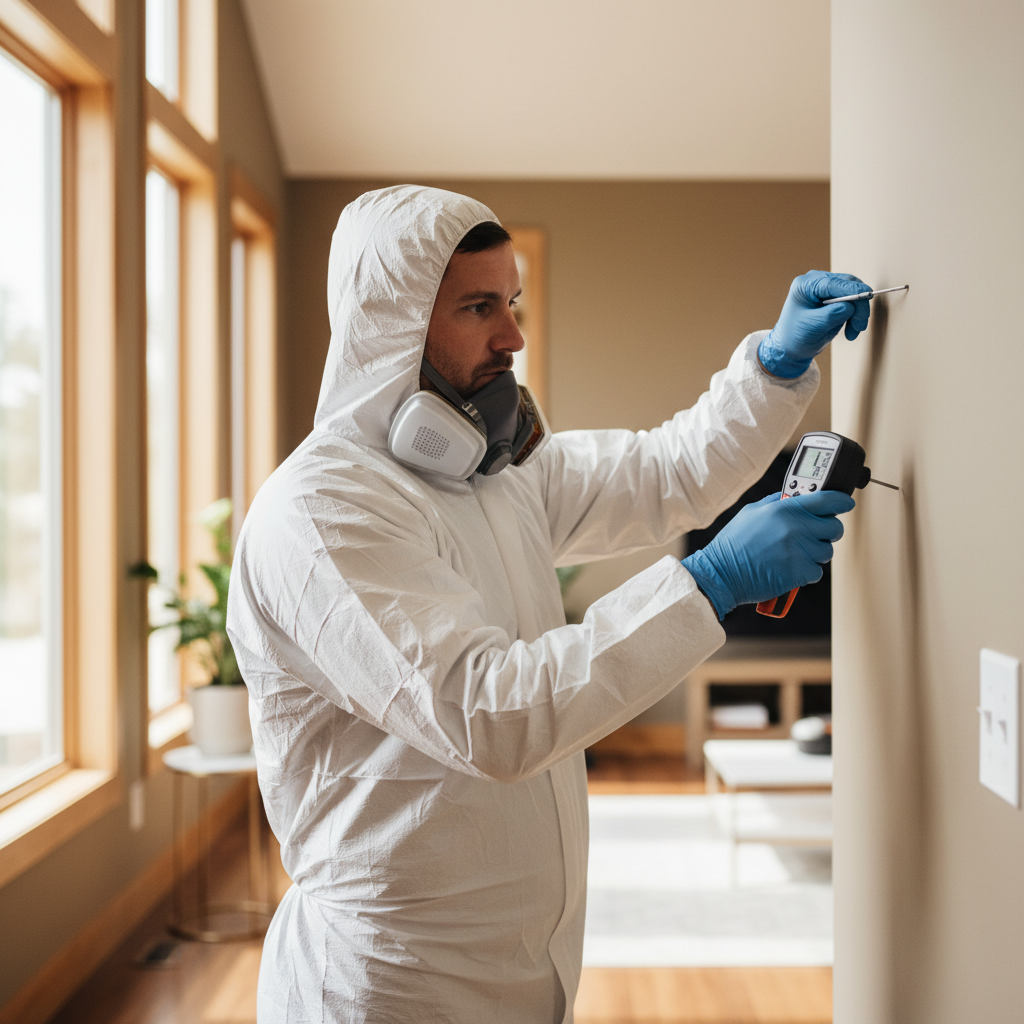
Everything starts here. A certified inspector arrives at your home with a moisture meter, thermal imaging camera, and often a borescope (a thin, flexible camera that can look inside wall cavities without cutting drywall). Their job is to figure out three things: where the mold is, how far it has spread, and what caused it.
The inspector walks through the affected area and checks surrounding rooms, because mold rarely stays in one place. They measure moisture levels in walls, floors, and ceilings — moisture readings above 15 to 17 percent in wood or drywall signal active conditions for mold growth. The thermal camera picks up temperature differences behind surfaces that often indicate hidden moisture pockets.
What They Are Looking For
- Visible mold growth — surface staining, discoloration, or fuzzy colonies on building materials
- Moisture sources — plumbing leaks, condensation patterns, groundwater intrusion, roof leaks, poor ventilation
- Extent of contamination — how many square feet are affected, how deep the mold has penetrated into materials
- Type of materials involved — drywall, wood framing, insulation, concrete, carpet, personal belongings
- HVAC involvement — whether mold has entered the ductwork or air handler
At the end of the inspection, you should get a written scope of work that outlines what needs to be done, which materials need to be removed, and a cost estimate. Reputable companies provide this before any work begins.
Pin and pinless moisture meters, infrared thermal imaging camera, borescope camera, hygrometer (measures ambient humidity). Some inspectors also use particle counters that give a real-time spore count of indoor air.
Inspection takes 1 to 3 hours depending on the size of the home. Cost: $300 to $600 for a thorough inspection. Some companies offer free inspections as part of their remediation service — but make sure the company doing the inspection is not the only one quoting the work. Independent inspectors have no financial incentive to inflate the scope.
Mold Testing and Lab Analysis
Testing is not always required, but it is the only way to know exactly what species of mold you are dealing with. The inspector collects samples and sends them to an accredited laboratory — results typically come back in 2 to 5 business days.
There are three common types of samples:
- Air samples — a calibrated air pump draws a specific volume of air over a collection surface. The lab counts and identifies spore types. Indoor counts are compared against outdoor baseline samples to determine if indoor levels are elevated.
- Surface samples — tape lift, swab, or bulk samples taken directly from contaminated materials. These tell you exactly what is growing on a specific surface.
- Bulk samples — a physical piece of contaminated material (drywall, insulation, carpet) is sent to the lab for analysis. This gives the most complete picture of what is happening inside the material, not just on the surface.
When Testing Matters Most
Testing is particularly valuable when someone in the household has health symptoms, when you need documentation for insurance or a real estate transaction, when the mold species would change the remediation approach, or when there is a dispute about whether mold is actually present. If you can see obvious mold and the cause is clear, some reputable companies will recommend skipping testing and applying the money toward the actual remediation.
Calibrated air sampling pumps (Zefon Air-O-Cell cassettes are common), sterile swabs, transparent tape for lift samples, sample chain-of-custody forms. Labs use microscopy and sometimes culture analysis to identify species and concentration.
Sample collection: 30 to 60 minutes. Lab turnaround: 2 to 5 business days (rush results available in 24 hours for an additional fee). Cost: $150 to $400 for air testing, $75 to $200 per surface or bulk sample. A typical home might need 3 to 5 samples total.
Want to Know What You're Dealing With?
A certified mold inspector can assess your home, identify the problem, and give you a clear scope of work before any remediation starts. No guesswork.
Call (888) 751-3962Free, no-obligation phone consultation. Compare certified pros in your area.
Containment
This is the step that separates professional remediation from every DIY attempt. Before anyone touches the mold, the work area is sealed off from the rest of the house to prevent spores from spreading during removal.
The crew builds a containment chamber using heavy-duty polyethylene sheeting (typically 6-mil thick) taped to walls, ceiling, and floor around the work area. Doorways, vents, and any openings to adjacent rooms are sealed. If the HVAC system serves the work area, the registers in the containment zone are sealed and the system may be turned off during active removal.
Negative Air Pressure
Here is the part that matters: the remediation crew sets up negative air pressure inside the containment zone. This means air flows into the work area but cannot flow out into the rest of the house. They achieve this with commercial air scrubbers and exhaust fans that pull air out of the containment and vent it outside through a sealed duct or window port. Any spores released during removal get pulled away from the living spaces, not toward them.
Think of it like a clean room in reverse. Instead of keeping contaminants out, containment keeps them in — and then removes them.
6-mil polyethylene sheeting, contractor-grade tape (no standard duct tape — it fails under negative pressure), zippered access doors for crew entry/exit, commercial negative air machines, manometer to verify pressure differential. For larger jobs, a decontamination chamber may be set up at the containment entrance.
Containment setup: 2 to 4 hours for a single-room job, up to a full day for multi-room or complex layouts. Cost is typically included in the overall remediation quote — not billed separately. If a company tells you they do not set up containment, that is a dealbreaker. Walk away.
Air Filtration
Air filtration runs continuously from the moment containment goes up until the clearance test passes. This is non-negotiable in professional remediation. The machines doing this work are called HEPA air scrubbers, and they are not the portable air purifiers you buy at a hardware store.
HEPA stands for High Efficiency Particulate Air. A true HEPA filter captures 99.97 percent of particles down to 0.3 microns in size. Mold spores are typically 1 to 30 microns — well within the capture range. These machines cycle the air inside the containment zone multiple times per hour, continuously stripping spores, fragments, and dust from the air.
How Air Scrubbers Work
Air is pulled through a pre-filter (catches large debris), then through the HEPA filter (catches spores), and exhausted as clean air. In a negative pressure setup, the exhaust can be ducted outside, which means contaminated air goes out of the house entirely. The machines run 24 hours a day during the project — even overnight when no crew is on site.
A note on ozone generators: Some companies use ozone generators as part of their air treatment. Ozone can kill mold, but it also damages lung tissue, rubber seals, and electronics. The EPA has stated that ozone generators should not be used in occupied spaces. If a company proposes ozone treatment, confirm that no one will be in the home during and for several hours after treatment.
Commercial HEPA air scrubbers (typical capacity: 500 to 2,000 CFM), negative air machines with HEPA filtration, ducting for outside exhaust. Larger jobs may use multiple units to ensure adequate air changes per hour within the containment zone.
Air filtration runs continuously throughout the entire project — typically 3 to 7 days. Equipment rental cost is built into the overall remediation price. Standalone air scrubber rental (if you are coordinating your own project): roughly $200 to $400 per day per unit.
Mold Removal
This is the core of the project — physically removing contaminated materials and eliminating the mold colony. The approach depends on what the mold is growing on. Porous materials and non-porous materials are handled very differently.
Porous Materials (Usually Removed)
Drywall, insulation, carpet, carpet padding, ceiling tiles, and heavily contaminated wood generally cannot be cleaned. The mold has grown root structures (hyphae) deep into the material, and surface cleaning leaves the colony intact. These materials are carefully cut out, double-bagged in heavy-duty poly bags, and removed from the containment through a sealed pathway to prevent cross-contamination.
The crew typically cuts 12 to 24 inches beyond the visible edge of contamination to ensure they get the full extent of the colony. After removal, the exposed framing and substrate behind are inspected for additional contamination.
Non-Porous and Semi-Porous Materials (Usually Cleaned)
Concrete, metal, glass, sealed wood, and structural framing can often be cleaned rather than replaced. The crew uses HEPA vacuums to remove loose spores, then scrubs surfaces with EPA-registered antimicrobial products. Wire brushing may be used on raw wood framing. After treatment, surfaces are HEPA-vacuumed again and visually inspected.
What About the Crew's Safety?
During active removal, technicians wear full personal protective equipment: N95 or P100 respirators (sometimes full-face), disposable Tyvek suits, gloves, and eye protection. They work inside the containment zone with air scrubbers running. Contaminated PPE is bagged and disposed of — it does not leave the containment zone and re-enter your home.
HEPA vacuums, utility knives and oscillating tools for drywall removal, wire brushes for wood treatment, EPA-registered antimicrobial solutions (not bleach), heavy-duty disposal bags, full PPE for technicians. For large structural removal jobs: reciprocating saws, pry bars, and dumpsters for material disposal.
Active removal: 1 to 3 days for most residential jobs. This is the most labor-intensive step. Cost: removal is typically the largest portion of the overall project — roughly 40 to 50 percent of the total quote. A $4,000 project might allocate $1,600 to $2,000 to the removal phase alone.
Compare Certified Pros in Your Area
Talk to local remediation specialists who hold IICRC or ACAC certifications. Get a scope of work and written estimate before any work starts.
Get Matched With Local ProsFree matching. No commitments. Takes under 2 minutes.
Cleaning and Sanitizing
After contaminated materials are removed, the remaining surfaces and the entire containment area need thorough cleaning. This is not a quick wipe-down — it is a systematic decontamination process that prepares the space for new materials.
What Gets Cleaned
- Exposed framing and substrate — HEPA vacuumed, then treated with antimicrobial solution, then HEPA vacuumed again
- Adjacent surfaces inside containment — walls, ceilings, and floors that were not removed but were inside the work zone
- Salvageable personal belongings — furniture, clothing, and other items that were in the affected area may be HEPA vacuumed and treated. Items that cannot be cleaned (heavily porous items like mattresses or upholstered furniture that were directly in the mold zone) may be recommended for disposal.
- HVAC components — if the system serves the work area, registers, returns, and accessible ductwork near the contamination zone are cleaned
Antimicrobial Treatment
After physical cleaning, surfaces are treated with an EPA-registered antimicrobial or antifungal product. This is different from a household disinfectant. Professional-grade antimicrobials are formulated to penetrate porous surfaces and leave a residual protective coating that inhibits regrowth. Common products include quaternary ammonium compounds, hydrogen peroxide-based solutions, and botanical antimicrobials. Bleach is not used — it is ineffective on porous building materials and can damage wood framing.
HEPA vacuums with brush attachments, pump sprayers for antimicrobial application, foggers for large-area treatment, microfiber cloths, clean water rinse equipment. Some companies use dry ice blasting for cleaning large structural areas like attic sheathing or crawl space joists.
Cleaning and sanitizing: 4 to 8 hours for a standard room, longer for multi-room jobs. Cost is included in the overall remediation quote. This step determines whether the project passes clearance testing — cutting corners here means the project fails and costs more to redo.
Restoration
Restoration is putting your home back together after the contaminated materials have been removed. The scope depends on how much material was taken out. A small project might need a few sheets of drywall and a coat of paint. A large project might require new framing, insulation, drywall, flooring, cabinetry, and trim.
Common Restoration Work
- Replacing drywall and taping/mudding seams
- Installing new insulation (fiberglass or spray foam)
- Priming and painting walls and ceilings
- Replacing baseboards, crown molding, and trim
- Installing new flooring (carpet, tile, or hardwood)
- Replacing cabinetry or shelving that was removed
- Repairing or replacing plumbing fixtures if the moisture source was a leak
Who Does the Restoration?
Some remediation companies handle restoration in-house. Others subcontract it or leave it to the homeowner's general contractor. If the remediation company offers restoration, it can simplify scheduling and accountability. If they subcontract or hand off, make sure the restoration work is not started until clearance testing passes — you do not want to seal up a wall that still has elevated spore counts behind it.
Insurance tip: If your remediation is covered by homeowner's insurance, restoration costs are typically included in the claim. Document everything with photos before, during, and after — especially the condition of removed materials. Your remediation company should provide a detailed scope of work that your adjuster can use for the claim.
Restoration: 1 to 5 days depending on scope. Cost: $500 to $5,000+ on top of remediation costs. A bathroom that needed drywall replacement and paint: roughly $800 to $1,500. A full basement or multiple-room job with flooring, insulation, and cabinetry: $3,000 to $8,000+. This is where the total project cost adds up — the remediation removes the problem, but restoration puts your home back to livable condition.
Clearance Testing
Clearance testing is the final verification that the remediation worked. An independent inspector (not the company that did the remediation) collects air and surface samples from the work area and compares them against outdoor baseline samples and pre-remediation readings.
This is the most important quality control step in the entire process. Without clearance testing, you have no objective proof that the problem is resolved.
What "Passing" Looks Like
- Indoor airborne mold spore counts are at or below outdoor levels
- No visible mold growth on any surfaces within the work area
- Moisture readings in treated areas are below acceptable thresholds (typically below 15 percent for wood, below 1 percent for drywall)
- The containment area is visually clean with no debris or dust
What Happens If It Fails
If clearance testing shows elevated spore counts or missed contamination, the remediation company goes back in to address the issue at no additional cost (this should be written into your contract). The area is re-cleaned, air scrubbers run for an additional period, and clearance testing is repeated. Reputable companies expect and plan for the possibility — it is not uncommon for the first clearance attempt to catch a few things that need touch-up work.
The clearance test should be performed by a different company or inspector than the one that did the remediation. This is an industry best practice and, in some states, a legal requirement. A company testing its own work has a financial incentive to pass it. An independent third party does not.
Same sampling equipment as initial testing: calibrated air sampling pumps, surface tape lifts, moisture meters. Samples go to the same type of accredited laboratory. The report includes side-by-side comparison of pre- and post-remediation levels.
Clearance testing: 1 to 2 hours on site, plus 2 to 5 business days for lab results. Cost: $200 to $500. Some remediation companies include one round of clearance testing in their project quote. If they don't, budget for it separately — skipping this step is not an option.
Ready to Get a Professional Assessment?
Every remediation project starts with an inspection. Talk to a certified specialist who can walk through your situation and give you a clear, written scope of work.
Call (888) 751-3962Free phone consultation. Local, certified companies. Available now.
Certifications to Look For
Not every company advertising "mold removal" is qualified to do the work properly. Mold remediation is a specialized trade with its own certifications, insurance requirements, and (in many states) licensing standards. Here is what to check before you hire anyone.
Industry Certifications
- IICRC (Institute of Inspection Cleaning and Restoration Certification) — the most widely recognized credential in the restoration industry. Look specifically for the AMRT (Applied Microbial Remediation Technician) and WRT (Water Damage Restoration Technician) designations. IICRC-certified technicians have completed hands-on training in containment, removal protocols, and safety procedures.
- ACAC (American Council for Accredited Certification) — offers the CMRS (Council-certified Microbial Remediation Supervisor) and CMC (Council-certified Microbial Consultant) credentials. ACAC certifications require passing a proctored exam and meeting continuing education requirements.
- State licenses — requirements vary. Texas, Louisiana, Florida, and Maryland are among the states that require specific mold remediation licenses. Check your state's contractor licensing board. Even in states without specific mold licensing, general contractor licenses and registration may apply.
Insurance Requirements
- General liability insurance — standard business coverage. Minimum $1 million per occurrence is typical.
- Pollution liability insurance — this is the critical one. Standard general liability policies exclude pollution-related claims. Mold remediation specifically requires pollution liability coverage. Ask for a certificate of insurance that names this coverage. If a company does not carry pollution liability insurance, they are not properly insured for mold work.
- Workers' compensation — required in most states. Protects you from liability if a worker is injured on your property.
Red Flags in Mold Remediation Companies
The mold industry has its share of operators who cut corners, overcharge, or do substandard work. Knowing the warning signs can save you thousands of dollars and a lot of frustration.
- No containment setup. Any company that starts removing mold without building containment barriers is spreading spores throughout your house. This is remediation 101. If they skip it, they are not qualified.
- Bleach as the primary treatment. Bleach does not kill mold on porous surfaces. It strips the color, making the mold invisible while leaving the root structure alive. Professional remediation uses EPA-registered antimicrobials, not household bleach.
- No clearance testing offered or recommended. If a company finishes the job and says "you're all set" without recommending independent clearance testing, they either do not follow industry protocols or do not want their work independently verified. Both are bad.
- Same company does testing and remediation with no independent verification. The company that profits from the remediation should not be the only one determining whether it is needed or whether it was successful. Use independent testing, especially for clearance.
- No written scope of work before starting. A verbal estimate is not sufficient. You need a written document that specifies what will be removed, what will be cleaned, the containment approach, and the expected timeline. Without it, you have no basis for holding the company accountable.
- High-pressure sales tactics or scare language. Legitimate remediation companies explain the situation factually and give you time to review the scope and get a second opinion. Companies that push urgency ("if you don't act today, your family is in danger") are selling fear, not solutions.
- Cannot provide proof of IICRC or ACAC certification. Certifications are verifiable. You can look up an IICRC-certified company on their website. If a company claims certification but cannot produce documentation, assume they are not certified.
- Quotes that seem dramatically low. Mold remediation has real costs: containment materials, HEPA equipment, labor, antimicrobials, disposal fees. A quote that is 50 percent below competitors probably means they are cutting out containment, air filtration, or proper disposal. You will pay more when the mold comes back.
Typical Project Timeline
Here is what a typical residential mold remediation project looks like from first call to final clearance. Actual timelines vary based on scope, lab turnaround, and scheduling.
Small Project (Single Room, Under 50 sq ft)
- Day 1: Inspection and testing samples collected
- Days 2-4: Lab results return
- Day 5: Containment setup, removal, cleaning, air scrubbers running
- Day 6: Final cleaning, antimicrobial treatment
- Day 7: Clearance testing
- Days 8-11: Lab confirms clearance, restoration begins
- Days 12-14: Restoration complete
Total: roughly 2 weeks from first call to finished project. Active work in your home: 3 to 5 days.
Large Project (Multiple Rooms or HVAC, Over 100 sq ft)
- Day 1: Comprehensive inspection with thermal imaging and borescope
- Days 2-5: Lab results, scope of work finalized, permits pulled if required
- Days 6-7: Containment build-out, equipment staged
- Days 8-12: Active removal and cleaning (3 to 5 days of work)
- Day 13: Clearance testing
- Days 14-17: Lab confirms clearance
- Days 18-25: Restoration (drywall, insulation, painting, flooring)
Total: roughly 3 to 4 weeks. Active crew presence: 7 to 12 days spread across the project.
How to Prepare Your Home Before Remediation
A little preparation on your end makes the crew's job faster and keeps your belongings protected. Most companies will send a preparation checklist before the crew arrives. Here are the common items.
- Clear the work area. Move furniture, rugs, stored items, and personal belongings at least 6 feet from the affected zone. Anything that stays in the containment area may need to be cleaned or could be damaged. If you cannot move large furniture, the crew can wrap it in protective sheeting.
- Secure or remove pets. HEPA air scrubbers are loud and run continuously. Pets should be out of the home during active remediation — both for their comfort and to prevent them from interfering with containment barriers.
- Provide clear access paths. The crew needs to move equipment, materials, and disposal bags in and out. Clear hallways and doorways between the work area and the nearest exterior door.
- Photograph everything before the crew arrives. Document the condition of the work area, adjacent rooms, floors, walls, and any personal property. This is important for insurance claims and for having a "before" record.
- Identify the moisture source beforehand if possible. If you know the mold was caused by a specific leak, tell the crew. If the leak has not been fixed yet, coordinate the plumbing or roofing repair so it happens before or during remediation. Removing mold without fixing the water source means the mold comes back.
- Plan for noise and limited access. HEPA air scrubbers, negative air machines, and demolition work are not quiet. Plan to use other parts of the home or leave during active work hours. You will not have access to the containment zone during the project.
- Ask about your HVAC system. Depending on the scope, the crew may need to turn off or modify your HVAC during remediation. In summer or winter, plan for alternate heating or cooling in the rest of the house if needed.
Not Sure Where to Start?
A quick phone call is the fastest way to get answers specific to your situation. Talk to a certified specialist who will walk you through the process, give you a ballpark cost, and explain your options.
Call (888) 751-3962No obligation. No pressure. Local specialists available 7 days a week.
After Remediation: Preventing Recurrence
The remediation is done, clearance testing passed, your walls are back up, and the house looks normal again. Now the question is: how do you make sure it stays that way? Mold does not come back on its own — it comes back when moisture comes back. Prevention is entirely about moisture control.
The Big Five Prevention Measures
- Fix every moisture source permanently. If the mold was caused by a plumbing leak, make sure the repair was done correctly — not just patched. If it was groundwater, invest in proper waterproofing. If it was condensation, solve the ventilation problem. The remediation company should have identified the source during their assessment. Follow through on their recommendation.
- Keep indoor humidity below 50 percent. Buy a digital hygrometer (under $15) and check readings in areas that had mold. If humidity consistently exceeds 50 percent, use a dehumidifier. Basements, crawl spaces, and bathrooms are the usual trouble spots. Run exhaust fans during and for 30 minutes after showers.
- Maintain your HVAC system. Change air filters every 60 to 90 days. Have your system serviced annually. Make sure drain pans and condensate lines are clear — a clogged condensate drain is one of the most common causes of mold in air handlers.
- Address water intrusion immediately. If you have a new leak or flooding event, start drying within 24 to 48 hours. Rent fans and a dehumidifier from your local hardware store while you arrange for professional assessment. Speed matters — mold cannot colonize dry materials.
- Inspect vulnerable areas twice a year. Walk your crawl space, check under sinks, look behind washers and dryers, inspect around windows and sliding doors. Catching a small leak before it becomes a mold problem is always cheaper than remediation.
A realistic note: Every home will have some amount of mold spores in the air. That is normal — outdoor air contains mold spores, and they enter your home every time you open a door. The goal is not zero mold. The goal is keeping indoor conditions dry enough that those spores cannot grow into colonies. Below 50 percent humidity and no standing moisture means no mold growth.
When to Re-Test
If you had a significant remediation project, consider having air quality tested again 6 to 12 months later — especially if you notice any musty odors or new staining. A follow-up test costs $200 to $400 and gives you objective data that conditions have remained normal. Think of it as a checkup, not a sign that something is wrong.
Take the First Step Today
Knowing the process is the hardest part. Now that you know what to expect, the next move is a phone call. We connect homeowners with certified, insured mold remediation companies in your area. Describe your situation, compare options, and make an informed decision.
Call (888) 751-3962Free consultation. Certified local companies. No commitments required.